> ## Documentation Index
> Fetch the complete documentation index at: https://mage-staging.mintlify.site/llms.txt
> Use this file to discover all available pages before exploring further.
# No-code UI interactions
> Configure and run pipelines using no-code UI text fields, dropdown menus, checkboxes, toggle switches, and more.

Available in version `0.9.35` and greater.
## Overview
Once you build a pipeline, you can add UI elements to enable other teams
(e.g. marketing, sales, etc.) to configure the pipeline’s variables without writing or
changing the code for the pipeline and it’s blocks.
### Why is this important?
Empower other people and teams to customize and run pipelines themselves.
Run a pipeline for someone and feed them for a day.
Teach them how to fish and they are fed for life:
 ***
## Features
* Add UI elements to a pipeline that can be used to customize the value of pipeline variables.
* Re-use UI elements in multiple different pipelines (don’t repeat yourself).
* Re-arrange UI elements using drag-and-drop actions.
* Restrict and permit specific user roles that can configure and run a pipeline that uses no-code interactions.
***
## How to add interactions
### Enable feature
1. Go to the [project preferences](http://localhost:6789/settings/workspace/preferences) and
enable the feature labeled `Interactions`.
### Create pipeline
1. Create a new batch pipeline.
2. Add a block.
3. Add variables to the block by using `kwargs['some_variable_uuid']` in the code.
For example:
```python theme={null}
@data_loader
def load_data(*args, **kwargs):
superhero_name = kwargs['superhero_name']
return dict(
superhero_name=superhero_name,
)
```
### Add block interactions
1. In the top right corner of the block, click the triple dot icon (e.g. `...`) and
click on the dropdown menu option labeled Add / Edit interactions.
***
## Features
* Add UI elements to a pipeline that can be used to customize the value of pipeline variables.
* Re-use UI elements in multiple different pipelines (don’t repeat yourself).
* Re-arrange UI elements using drag-and-drop actions.
* Restrict and permit specific user roles that can configure and run a pipeline that uses no-code interactions.
***
## How to add interactions
### Enable feature
1. Go to the [project preferences](http://localhost:6789/settings/workspace/preferences) and
enable the feature labeled `Interactions`.
### Create pipeline
1. Create a new batch pipeline.
2. Add a block.
3. Add variables to the block by using `kwargs['some_variable_uuid']` in the code.
For example:
```python theme={null}
@data_loader
def load_data(*args, **kwargs):
superhero_name = kwargs['superhero_name']
return dict(
superhero_name=superhero_name,
)
```
### Add block interactions
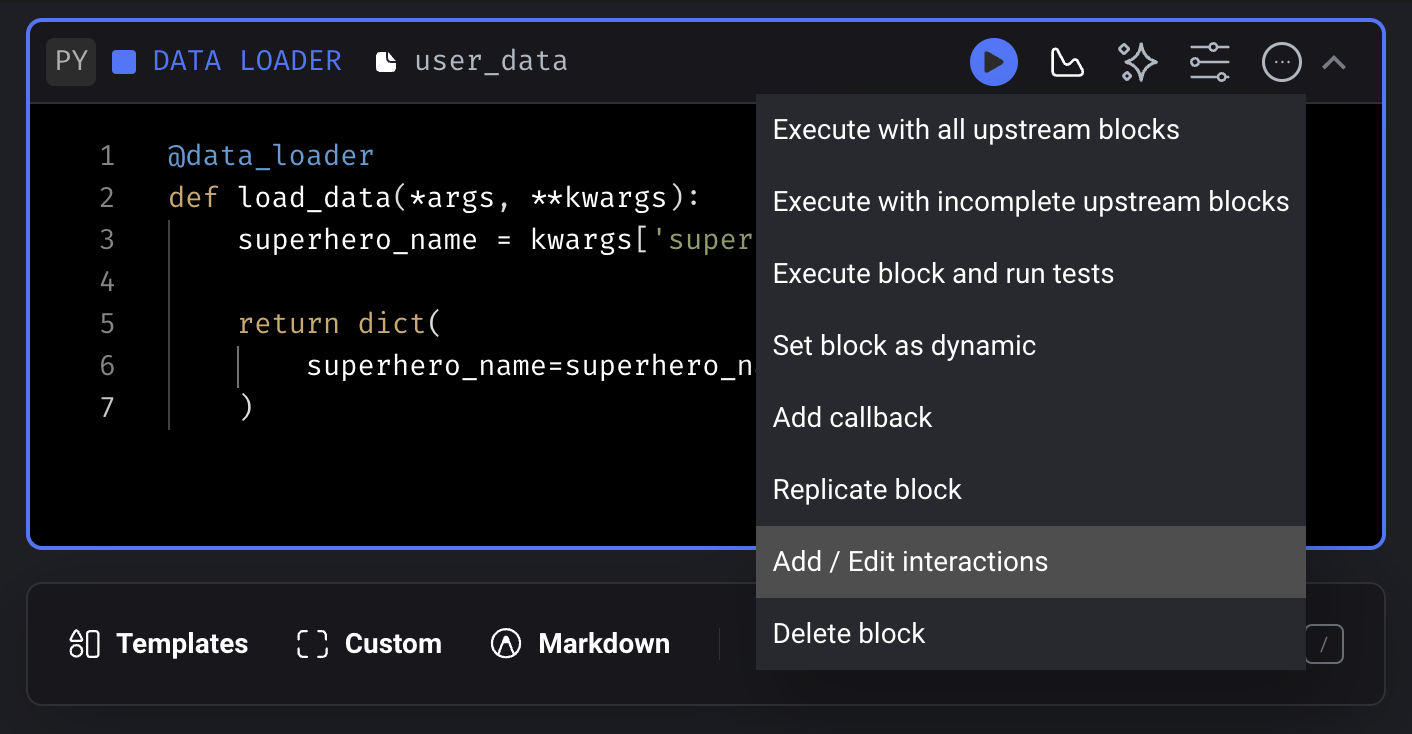
1. In the top right corner of the block, click the triple dot icon (e.g. `...`) and
click on the dropdown menu option labeled Add / Edit interactions.
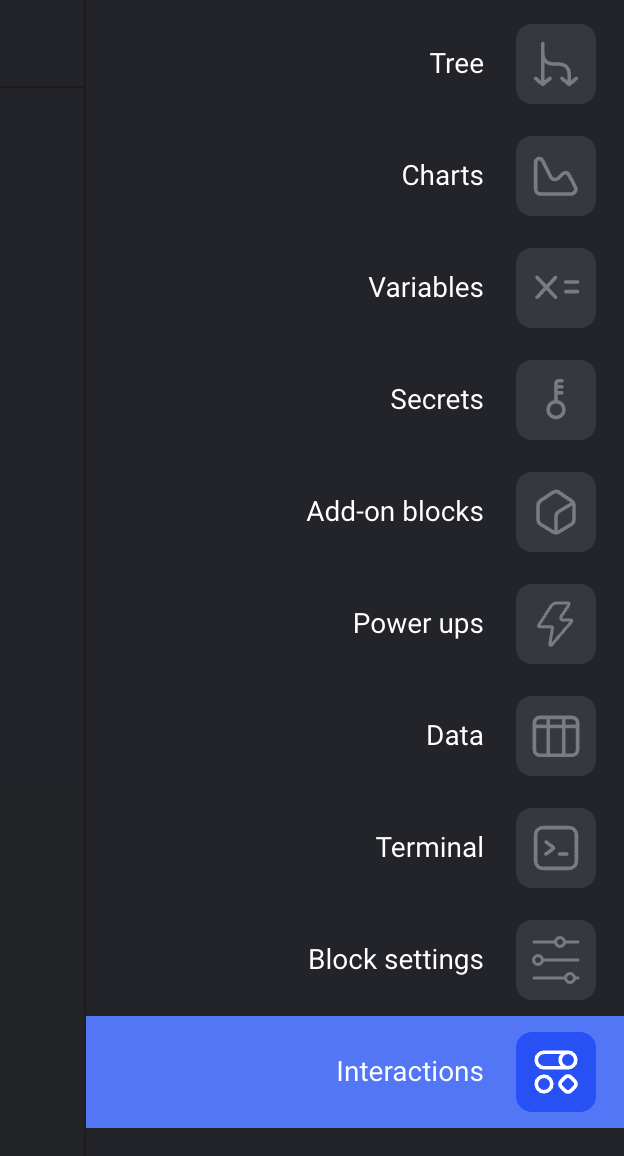
 Alternatively, open the right sidekick menu and
click the navigation item labeled Interactions.
Alternatively, open the right sidekick menu and
click the navigation item labeled Interactions.
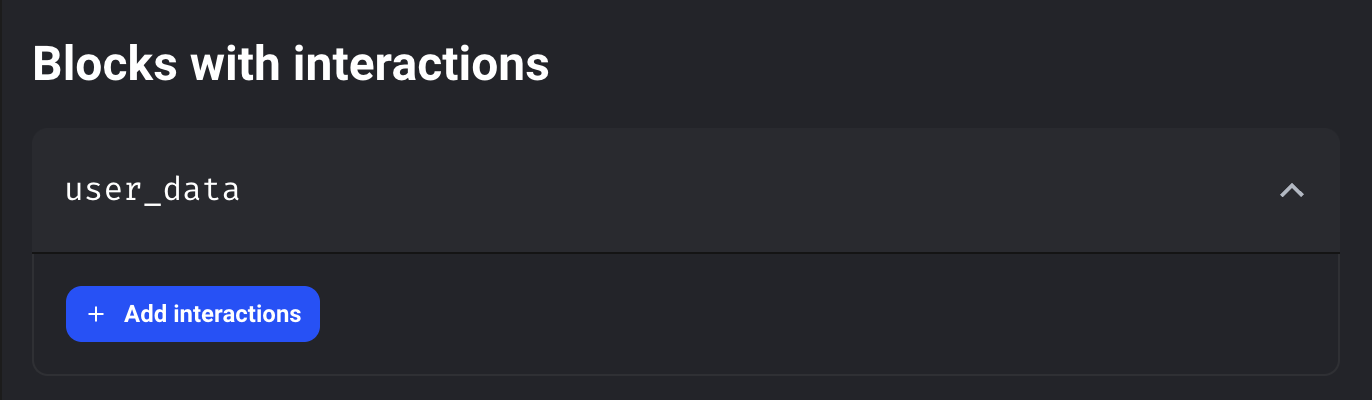
 2. If you don’t see that the block is currently selected,
click on the button labeled + Add interactions underneath the block that you want to add
interactions to.
2. If you don’t see that the block is currently selected,
click on the button labeled + Add interactions underneath the block that you want to add
interactions to.
 3. On the block interaction detail view for a single block,
click the button labeled + Create new set of interactions.
4. Enter a unique name for the set of interactions.
This unique name will be the file path to the interaction.
For example, an interaction name with `heroes/fire` will create the following file:
`[repo_path]/[project_name]/interactions/heroes/fire.yaml`.
### Configure interactions
3. On the block interaction detail view for a single block,
click the button labeled + Create new set of interactions.
4. Enter a unique name for the set of interactions.
This unique name will be the file path to the interaction.
For example, an interaction name with `heroes/fire` will create the following file:
`[repo_path]/[project_name]/interactions/heroes/fire.yaml`.
### Configure interactions
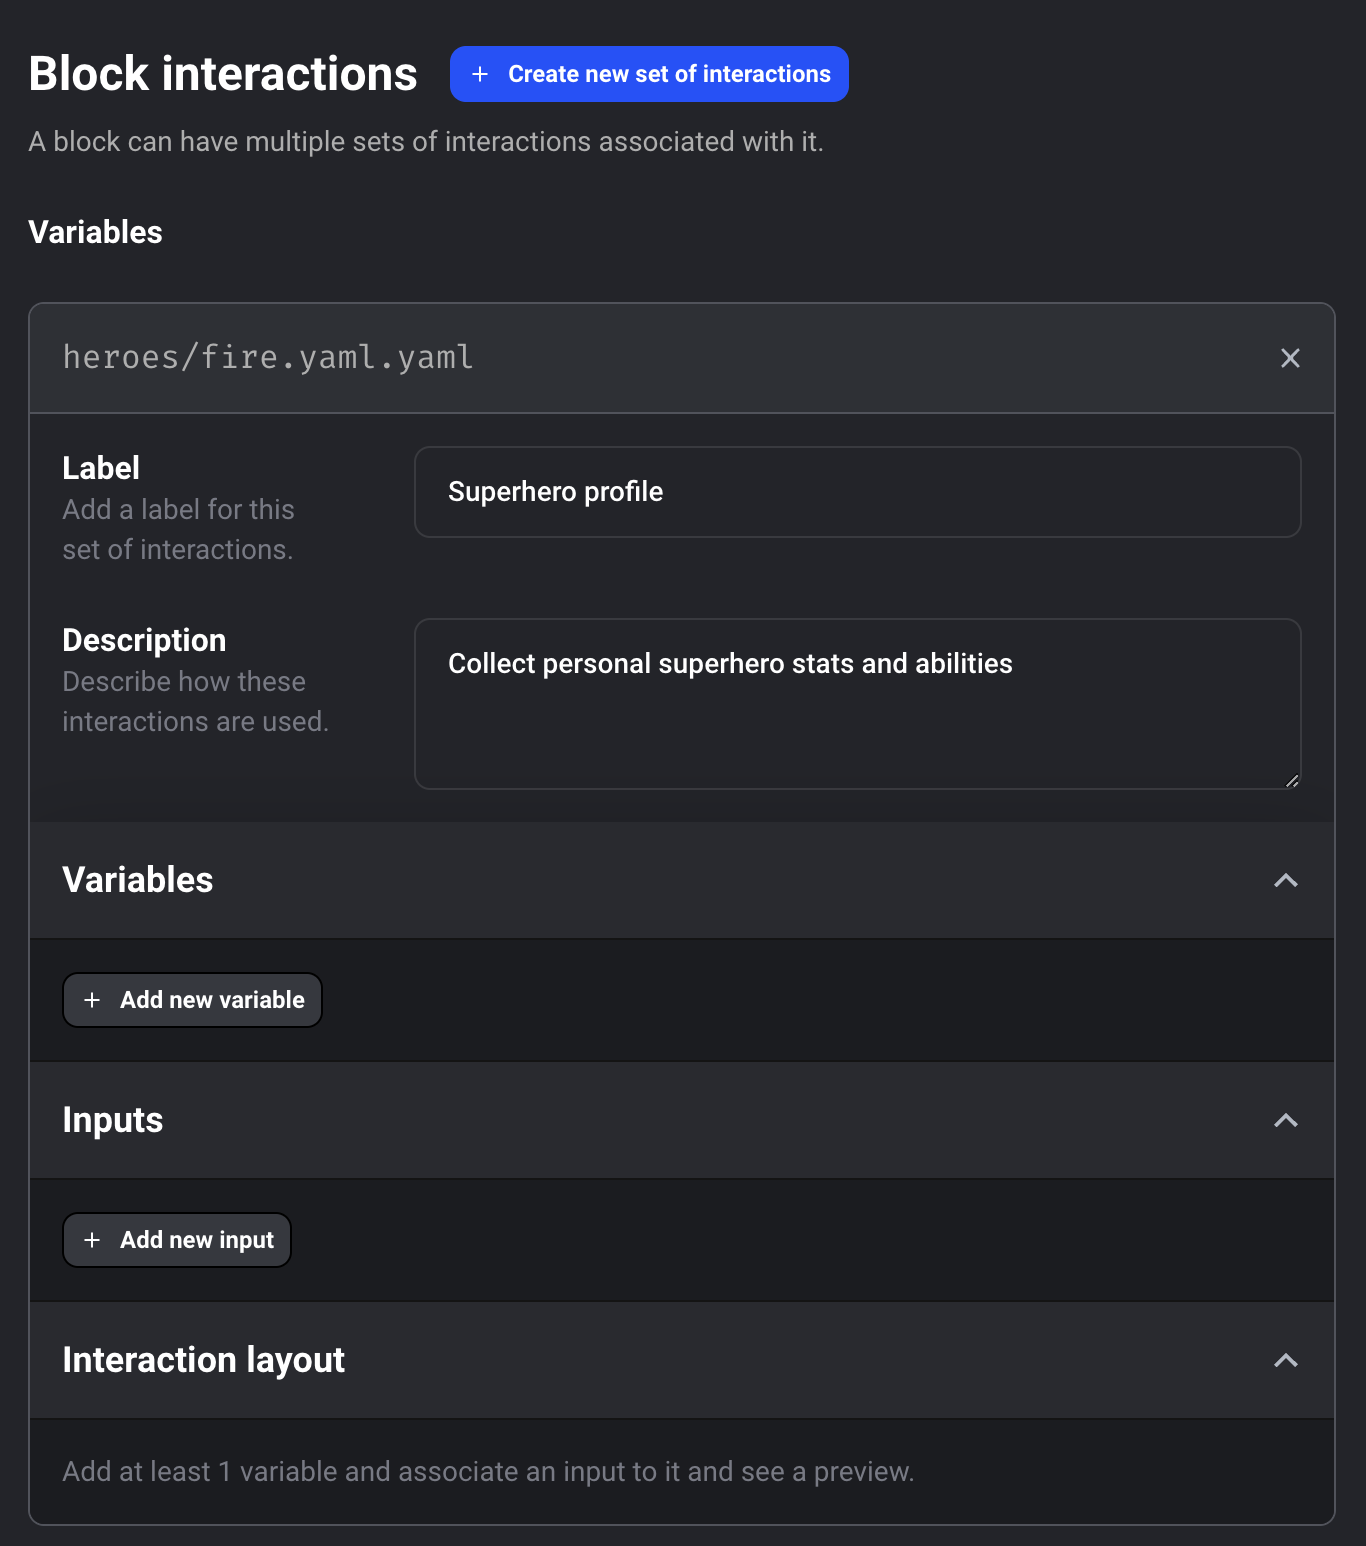 1. A set of interactions can have a label and description associated with it.
For example, a group of UI elements are related to a set of variables specifically used for
querying demographic data.
2. Optionally enter a label for the interaction.
3. Optionally enter a description for the interaction.
#### Variables
1. A set of interactions can have a label and description associated with it.
For example, a group of UI elements are related to a set of variables specifically used for
querying demographic data.
2. Optionally enter a label for the interaction.
3. Optionally enter a description for the interaction.
#### Variables
 1. Under the section labeled Variables, click the button labeled + Add new variable.
2. Enter a unique UUID for the new variable and click the button labeled Create variable.
This UUID will be the key that is used in the keyword arguments in the block’s code.
For example, the variable UUID `superhero_name` will be accessed in
code using `kwargs['superhero_name']`.
Variable UUIDs are unique across the entire pipeline.
The value from `kwargs['superhero_name']` can be accessed and used in any block
within the same pipeline.
Read this [documentation](/getting-started/runtime-variable) for more information about
pipeline variables.
3. Optionally set the variable to be required.
4. Add a label and description to the variable. This will be displayed alongside the UI element
associated to this variable.
5. Select 1 or more valid data types for this variable.
The value entered through the UI element associated to this variable
will be casted to the valid data types.
6. Under the Input option for this variable, select an existing input or create a new one
and associate it to this variable by selecting the dropdown option
labeled + Add a new input.
If you’re adding a new input, go to the next section for a step-by-step guide on how to add
and configure an input.
You must click the button at the bottom labeled Save changes for all interactions
to save your changes.
#### Inputs
1. Under the section labeled Variables, click the button labeled + Add new variable.
2. Enter a unique UUID for the new variable and click the button labeled Create variable.
This UUID will be the key that is used in the keyword arguments in the block’s code.
For example, the variable UUID `superhero_name` will be accessed in
code using `kwargs['superhero_name']`.
Variable UUIDs are unique across the entire pipeline.
The value from `kwargs['superhero_name']` can be accessed and used in any block
within the same pipeline.
Read this [documentation](/getting-started/runtime-variable) for more information about
pipeline variables.
3. Optionally set the variable to be required.
4. Add a label and description to the variable. This will be displayed alongside the UI element
associated to this variable.
5. Select 1 or more valid data types for this variable.
The value entered through the UI element associated to this variable
will be casted to the valid data types.
6. Under the Input option for this variable, select an existing input or create a new one
and associate it to this variable by selecting the dropdown option
labeled + Add a new input.
If you’re adding a new input, go to the next section for a step-by-step guide on how to add
and configure an input.
You must click the button at the bottom labeled Save changes for all interactions
to save your changes.
#### Inputs
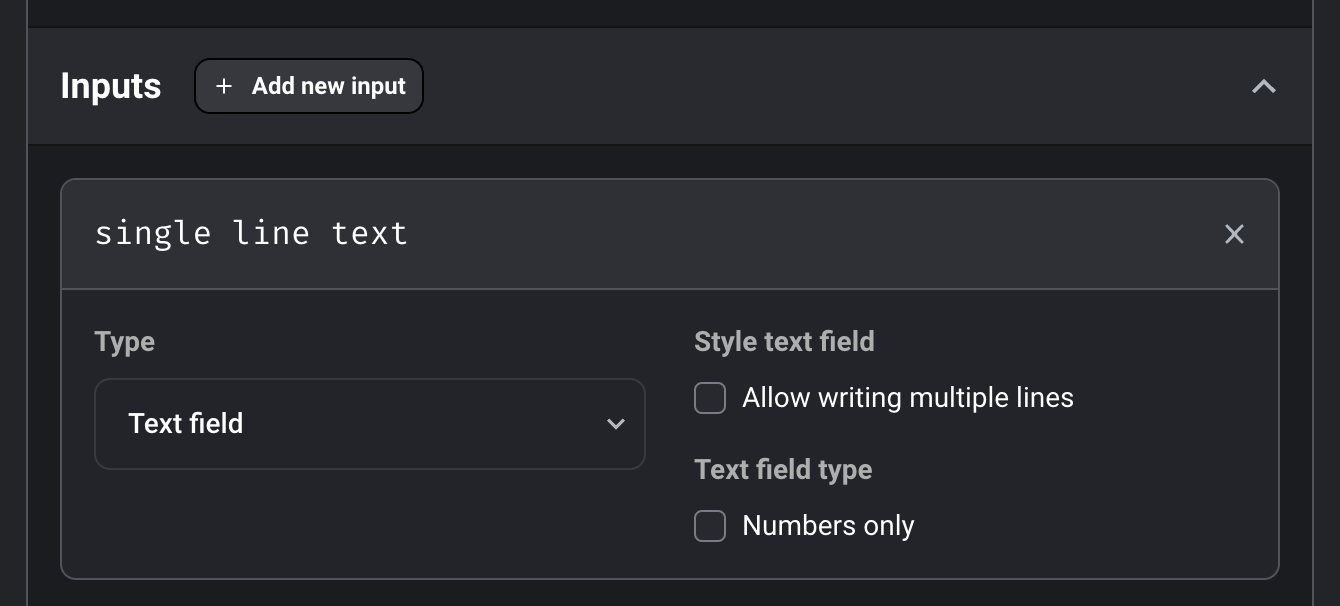 1. Under the section labeled Inputs, click the button labeled + Add new input.
2. Enter a unique UUID for the new input and click the button labeled Create input.
This input UUID must be unique within the same set of interactions.
An input can be used for multiple different variables.
For example, you may have multiple variables that are strings and you can reuse a single
text field input as the UI element for that variable.
3. Under the Type option for this input, select the dropdown option
labeled Text field.
4. Each input type has its own set of additional options that allow you to customize
the UI element further.
You must click the button at the bottom labeled Save changes for all interactions
to save your changes.
#### Layout
If you have 2 or more variables in the same set of interactions,
you can re-arrange the UI elements in different rows and columns.
1. Under the section labeled Inputs, click the button labeled + Add new input.
2. Enter a unique UUID for the new input and click the button labeled Create input.
This input UUID must be unique within the same set of interactions.
An input can be used for multiple different variables.
For example, you may have multiple variables that are strings and you can reuse a single
text field input as the UI element for that variable.
3. Under the Type option for this input, select the dropdown option
labeled Text field.
4. Each input type has its own set of additional options that allow you to customize
the UI element further.
You must click the button at the bottom labeled Save changes for all interactions
to save your changes.
#### Layout
If you have 2 or more variables in the same set of interactions,
you can re-arrange the UI elements in different rows and columns.
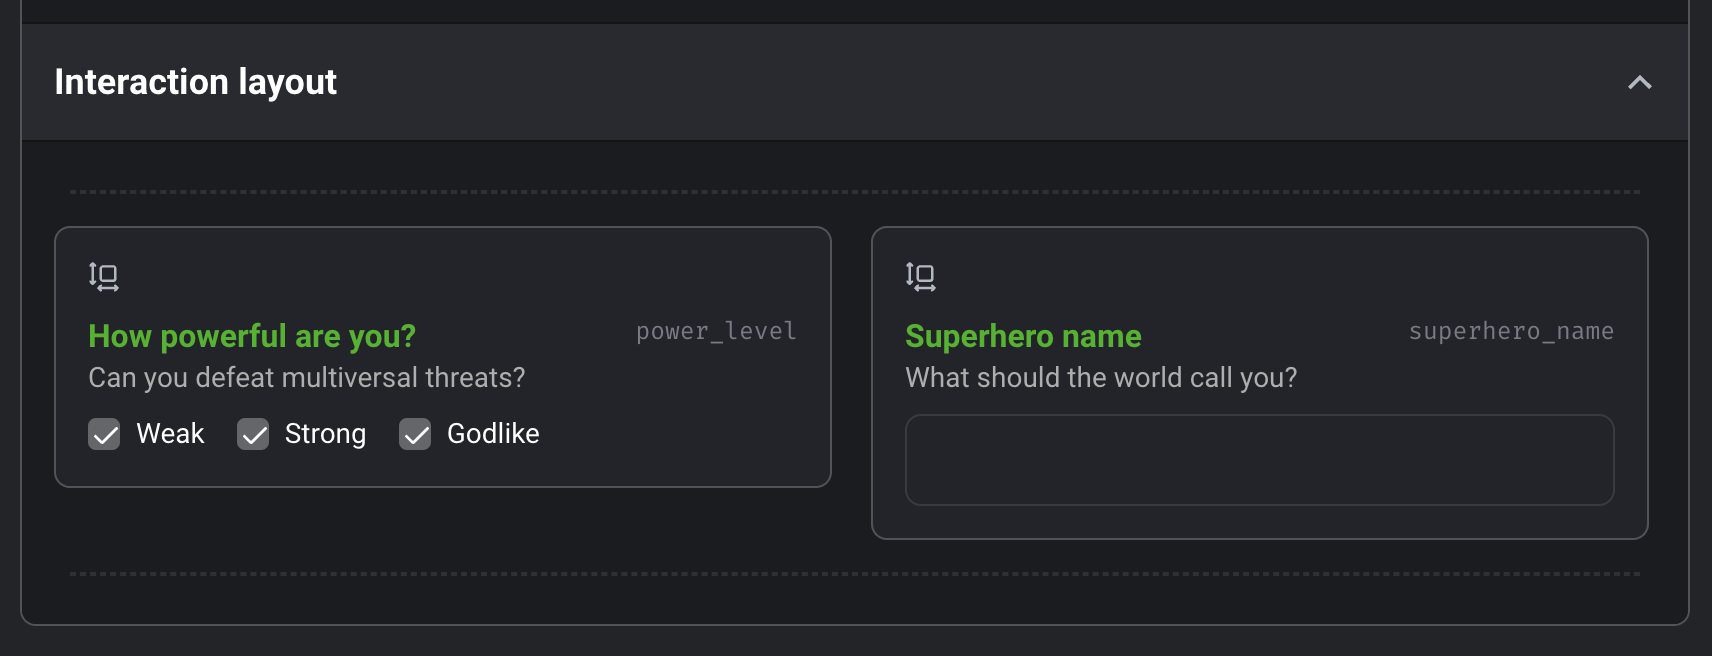 1. Under the section labeled Interaction layout,
hover over a UI element and drag it to another row or another column in the same row.
Then, drop the UI element to rearrange the layout.
You must click the button at the bottom labeled Save changes for all interactions
to save your changes.
### Preview and test block interactions
1. In the pipeline code section, click on the block with interactions.
2. Near the top of the block, click on the tab labeled INTERACTIONS.
3. Enter in values for each UI element.
4. Execute and run the block.
1. Under the section labeled Interaction layout,
hover over a UI element and drag it to another row or another column in the same row.
Then, drop the UI element to rearrange the layout.
You must click the button at the bottom labeled Save changes for all interactions
to save your changes.
### Preview and test block interactions
1. In the pipeline code section, click on the block with interactions.
2. Near the top of the block, click on the tab labeled INTERACTIONS.
3. Enter in values for each UI element.
4. Execute and run the block.
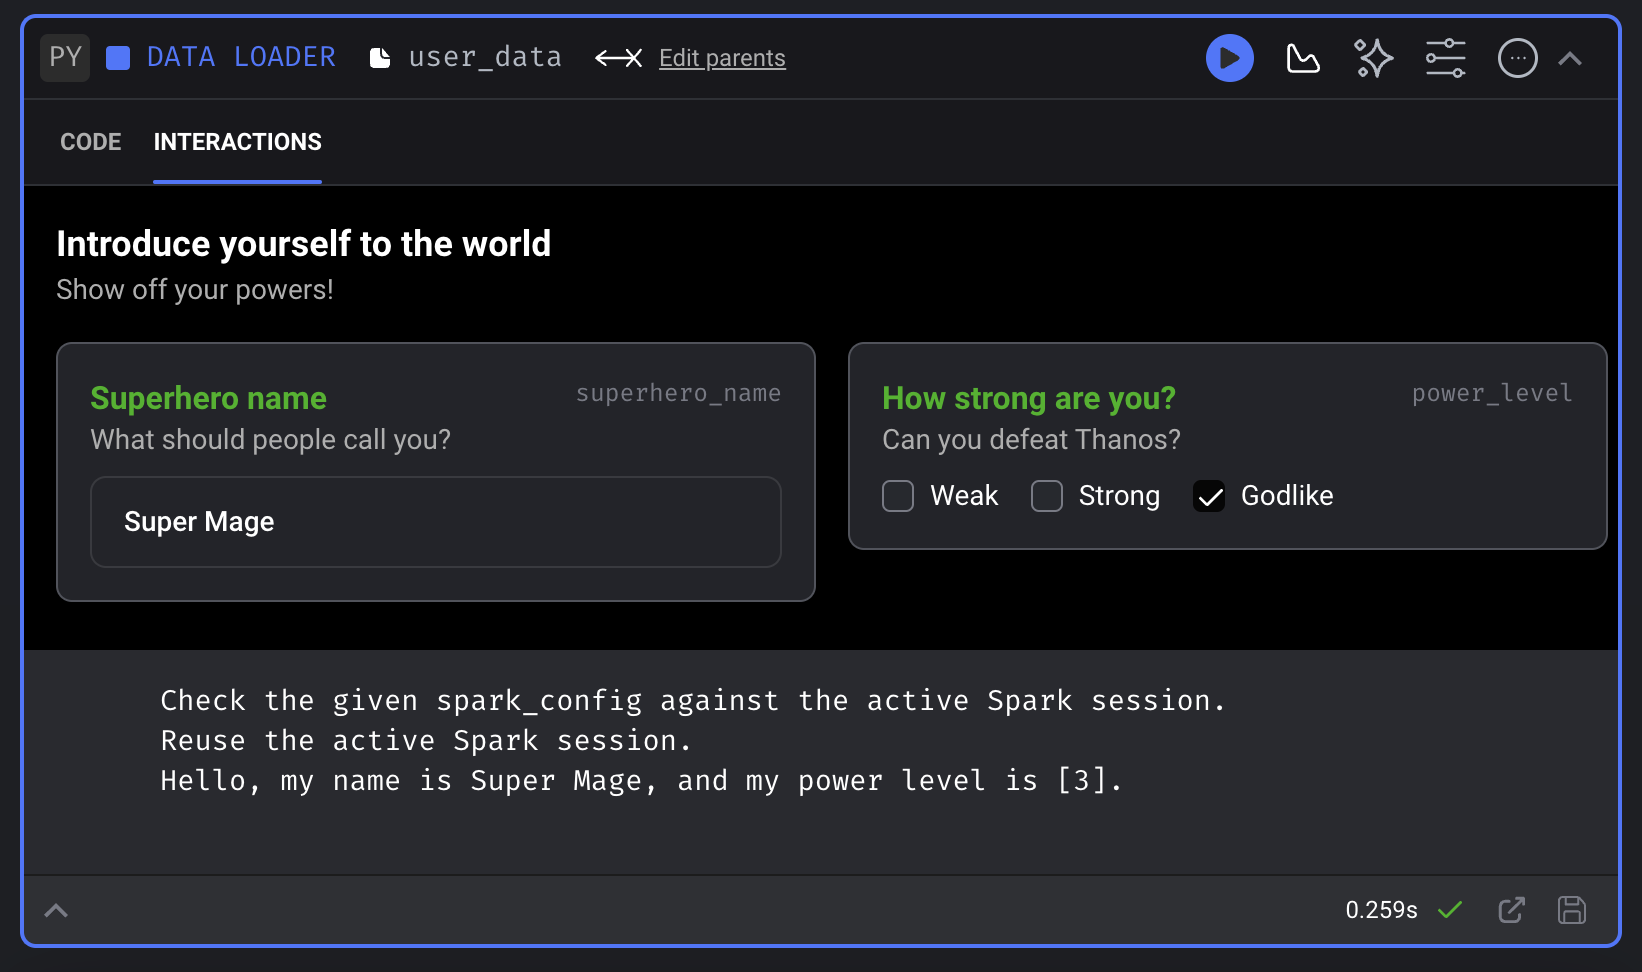 The block code to the example in the image above is:
```python theme={null}
@data_loader
def load_data(*args, **kwargs):
superhero_name = kwargs['superhero_name']
power_level = kwargs['power_level']
print(
f'Hello, my name is {superhero_name}, and my power level is {power_level}.',
)
```
The interactions YAML file (e.g. `[repo_path]/[project_name]/interactions/heroes/fire.yaml`) is:
```yaml theme={null}
inputs:
checkboxes:
options:
- label: Weak
value: '0'
- label: Strong
value: '1'
- label: Godlike
value: '3'
type: checkbox
single line text field:
type: text_field
layout:
- - variable: superhero_name
width: 1
- variable: power_level
width: 1
variables:
power_level:
description: Can you defeat Thanos?
input: checkboxes
name: How strong are you?
types:
- list
- integer
superhero_name:
description: What should people call you?
input: single line text field
name: Superhero name
required: true
types:
- string
```
### Permissions
Add permissions to allow specific user roles the ability to trigger a pipeline
using interactions defined in the pipeline.
1. Open the right sidekick menu and
click the navigation item labeled Interactions.
2. Under the section labeled Permissions, click the button labeled + Add permission.
3. A new row will be appended.
4. In the row for a single permission, click the button labeled + Add trigger.
5. Select a trigger type and optionally a trigger interval that you want to allow a user to create
for this pipeline through these interactions.
1. You can add as many trigger type and trigger interval combinations as you want to a single
permission row.
6. In the row for a single permission, click the button labeled + Add role.
7. Select a role that a user must have in order to trigger this pipeline.
A user with a valid role will be able to trigger this pipeline using only the permitted
combination(s) of trigger types and trigger intervals defined in the same permission as
the permitted role.
You must click the button at the bottom labeled Save changes for all interactions
to save your changes.
In the example image below,
a user with the role `Viewer` can trigger this pipeline only using a
scheduled trigger with the interval `@once`.
A user with the role `Editor` can do everything a `Viewer` role can do.
In addition, the role `Editor` can trigger this pipeline using a
scheduled trigger with the interval `@hourly`.
***
## Trigger pipeline using interactions
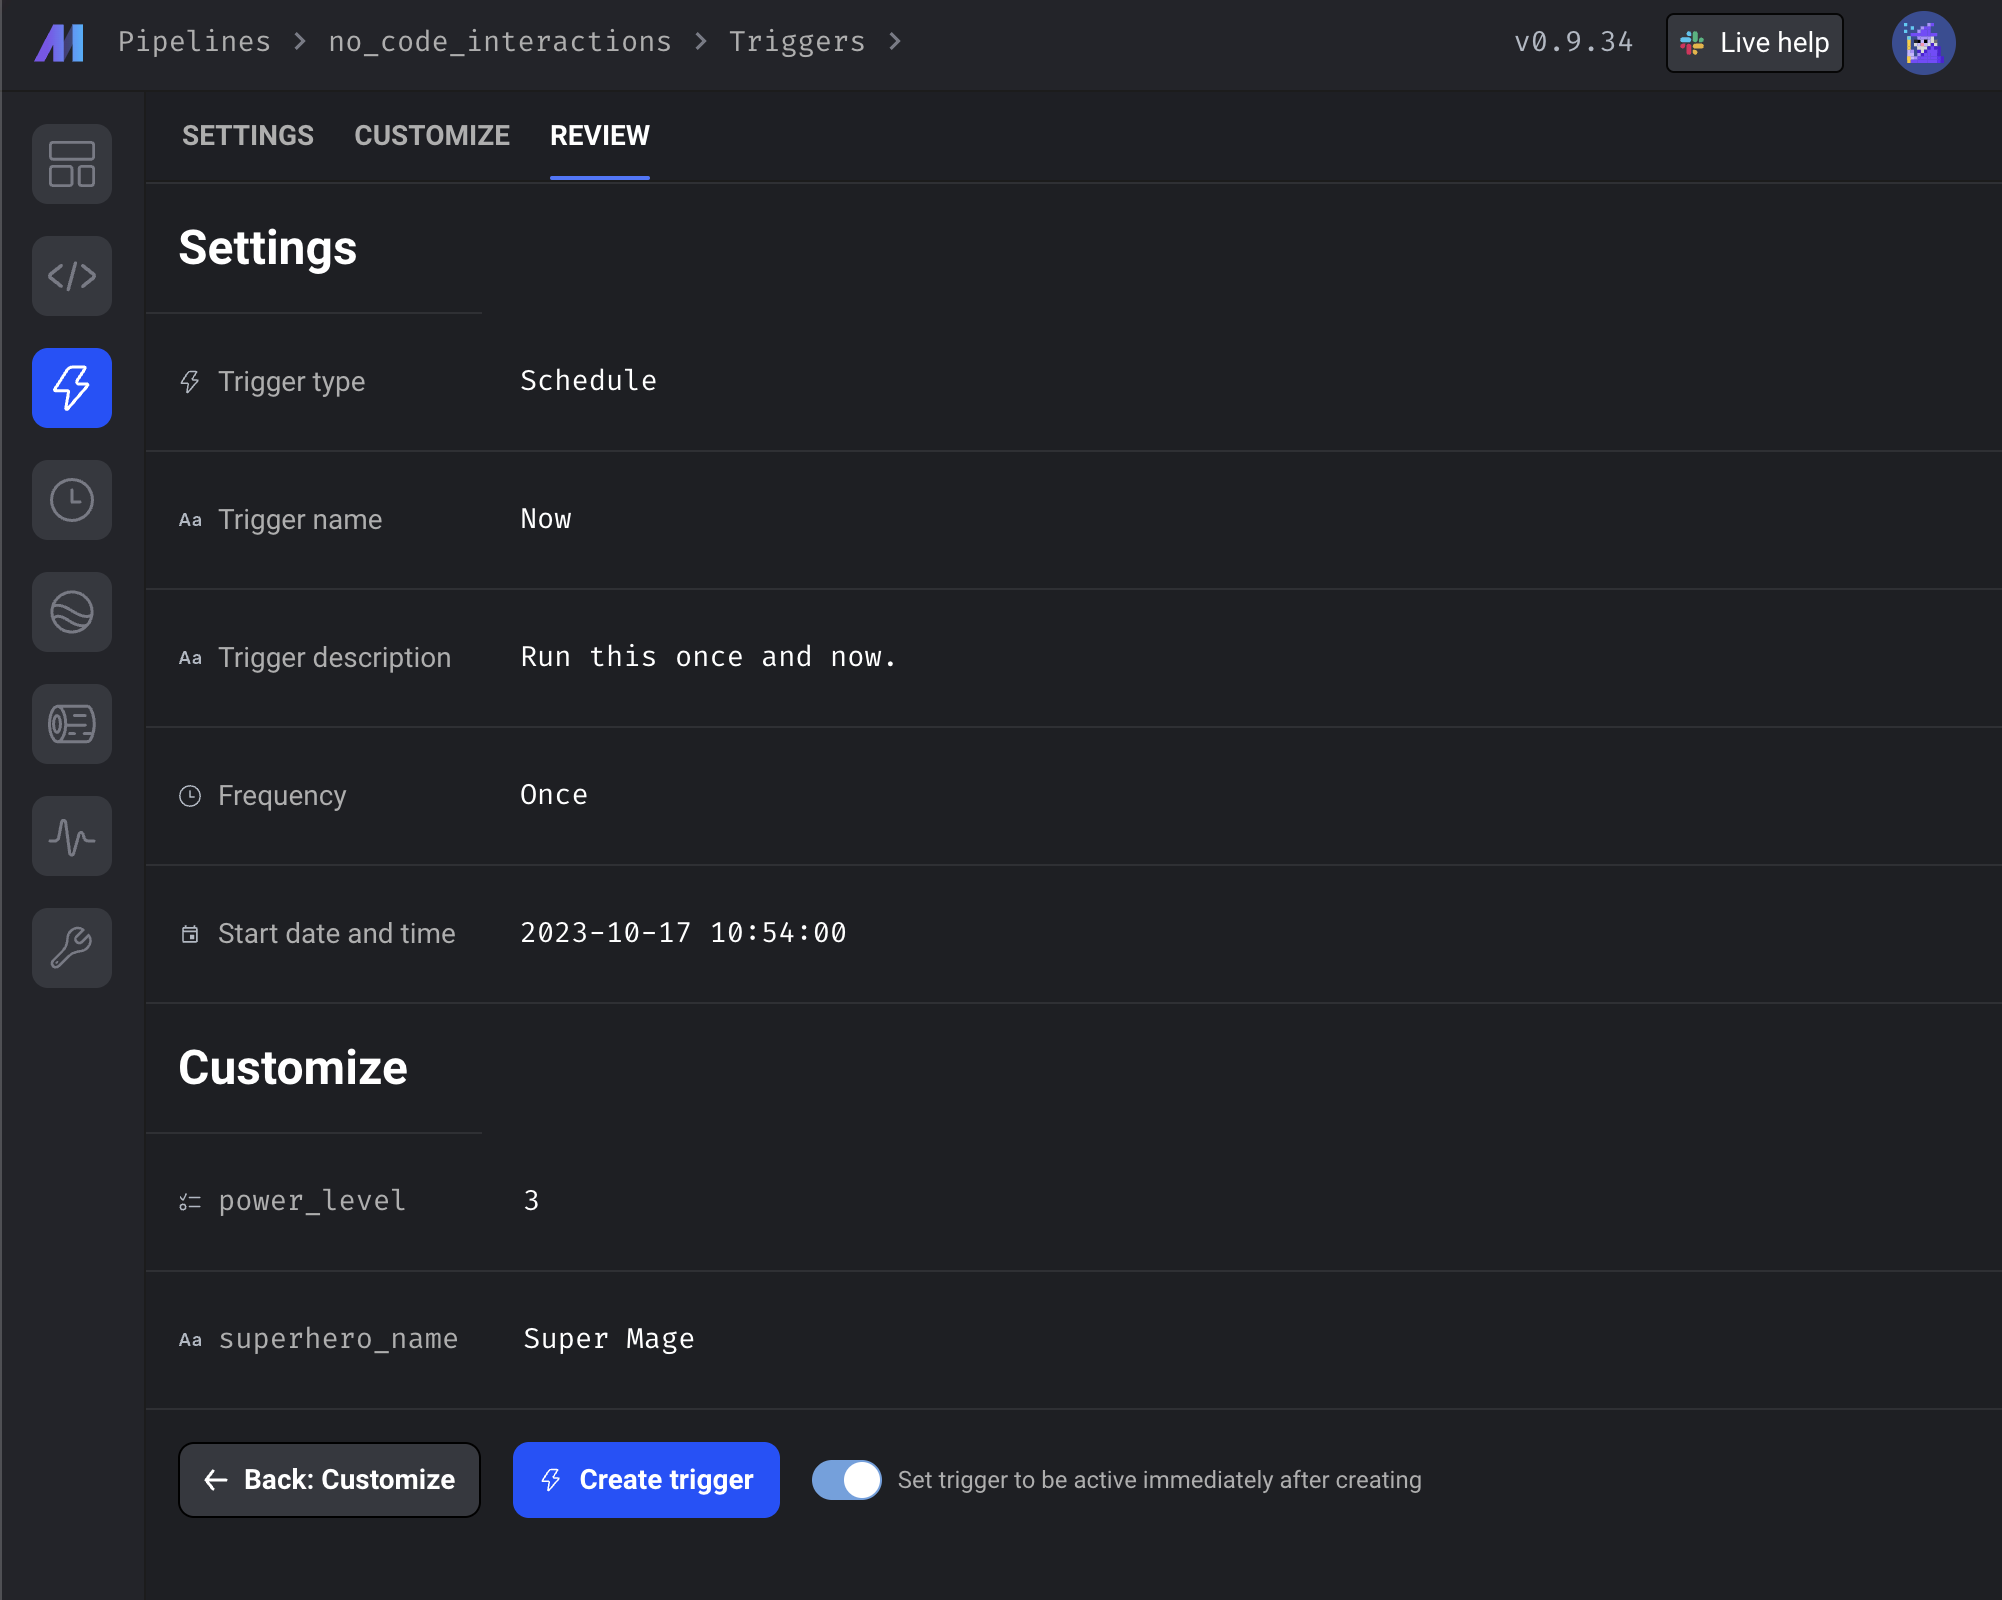
1. Go to the pipeline’s triggers page (e.g. `http://localhost:6789/pipelines/[uuid]/triggers`)
and click the button labeled Create trigger with no-code.
2. Enter in the information for every field under the SETTINGS tab,
then click the button labeled Next: Customize.
3. Enter in the information for every required field under the CUSTOMIZE tab,
then click the button labeled Next: Review.
4. On the REVIEW tab, verify all the information is correct.
5. Optionally, toggle the switch with the label Set trigger to be active immediately after creating
to immediately make the trigger active so it runs as soon as create the trigger.
6. Click the button labeled Create trigger to save the trigger.
The block code to the example in the image above is:
```python theme={null}
@data_loader
def load_data(*args, **kwargs):
superhero_name = kwargs['superhero_name']
power_level = kwargs['power_level']
print(
f'Hello, my name is {superhero_name}, and my power level is {power_level}.',
)
```
The interactions YAML file (e.g. `[repo_path]/[project_name]/interactions/heroes/fire.yaml`) is:
```yaml theme={null}
inputs:
checkboxes:
options:
- label: Weak
value: '0'
- label: Strong
value: '1'
- label: Godlike
value: '3'
type: checkbox
single line text field:
type: text_field
layout:
- - variable: superhero_name
width: 1
- variable: power_level
width: 1
variables:
power_level:
description: Can you defeat Thanos?
input: checkboxes
name: How strong are you?
types:
- list
- integer
superhero_name:
description: What should people call you?
input: single line text field
name: Superhero name
required: true
types:
- string
```
### Permissions
Add permissions to allow specific user roles the ability to trigger a pipeline
using interactions defined in the pipeline.
1. Open the right sidekick menu and
click the navigation item labeled Interactions.
2. Under the section labeled Permissions, click the button labeled + Add permission.
3. A new row will be appended.
4. In the row for a single permission, click the button labeled + Add trigger.
5. Select a trigger type and optionally a trigger interval that you want to allow a user to create
for this pipeline through these interactions.
1. You can add as many trigger type and trigger interval combinations as you want to a single
permission row.
6. In the row for a single permission, click the button labeled + Add role.
7. Select a role that a user must have in order to trigger this pipeline.
A user with a valid role will be able to trigger this pipeline using only the permitted
combination(s) of trigger types and trigger intervals defined in the same permission as
the permitted role.
You must click the button at the bottom labeled Save changes for all interactions
to save your changes.
In the example image below,
a user with the role `Viewer` can trigger this pipeline only using a
scheduled trigger with the interval `@once`.
A user with the role `Editor` can do everything a `Viewer` role can do.
In addition, the role `Editor` can trigger this pipeline using a
scheduled trigger with the interval `@hourly`.
***
## Trigger pipeline using interactions
1. Go to the pipeline’s triggers page (e.g. `http://localhost:6789/pipelines/[uuid]/triggers`)
and click the button labeled Create trigger with no-code.
2. Enter in the information for every field under the SETTINGS tab,
then click the button labeled Next: Customize.
3. Enter in the information for every required field under the CUSTOMIZE tab,
then click the button labeled Next: Review.
4. On the REVIEW tab, verify all the information is correct.
5. Optionally, toggle the switch with the label Set trigger to be active immediately after creating
to immediately make the trigger active so it runs as soon as create the trigger.
6. Click the button labeled Create trigger to save the trigger.