> ## Documentation Index
> Fetch the complete documentation index at: https://mage-staging.mintlify.site/llms.txt
> Use this file to discover all available pages before exploring further.
# GitHub integration
> Authenticate with GitHub then pull from a remote repository, push local changes to a remote repository, and create pull requests for a remote repository.
 On the homepage in the left side navigation, click the link labeled Version control.
The URL could look something like this: [http://localhost:6789/version-control](http://localhost:6789/version-control).
## Demo
## Setup
On the homepage in the left side navigation, click the link labeled Version control.
The URL could look something like this: [http://localhost:6789/version-control](http://localhost:6789/version-control).
## Demo
## Setup
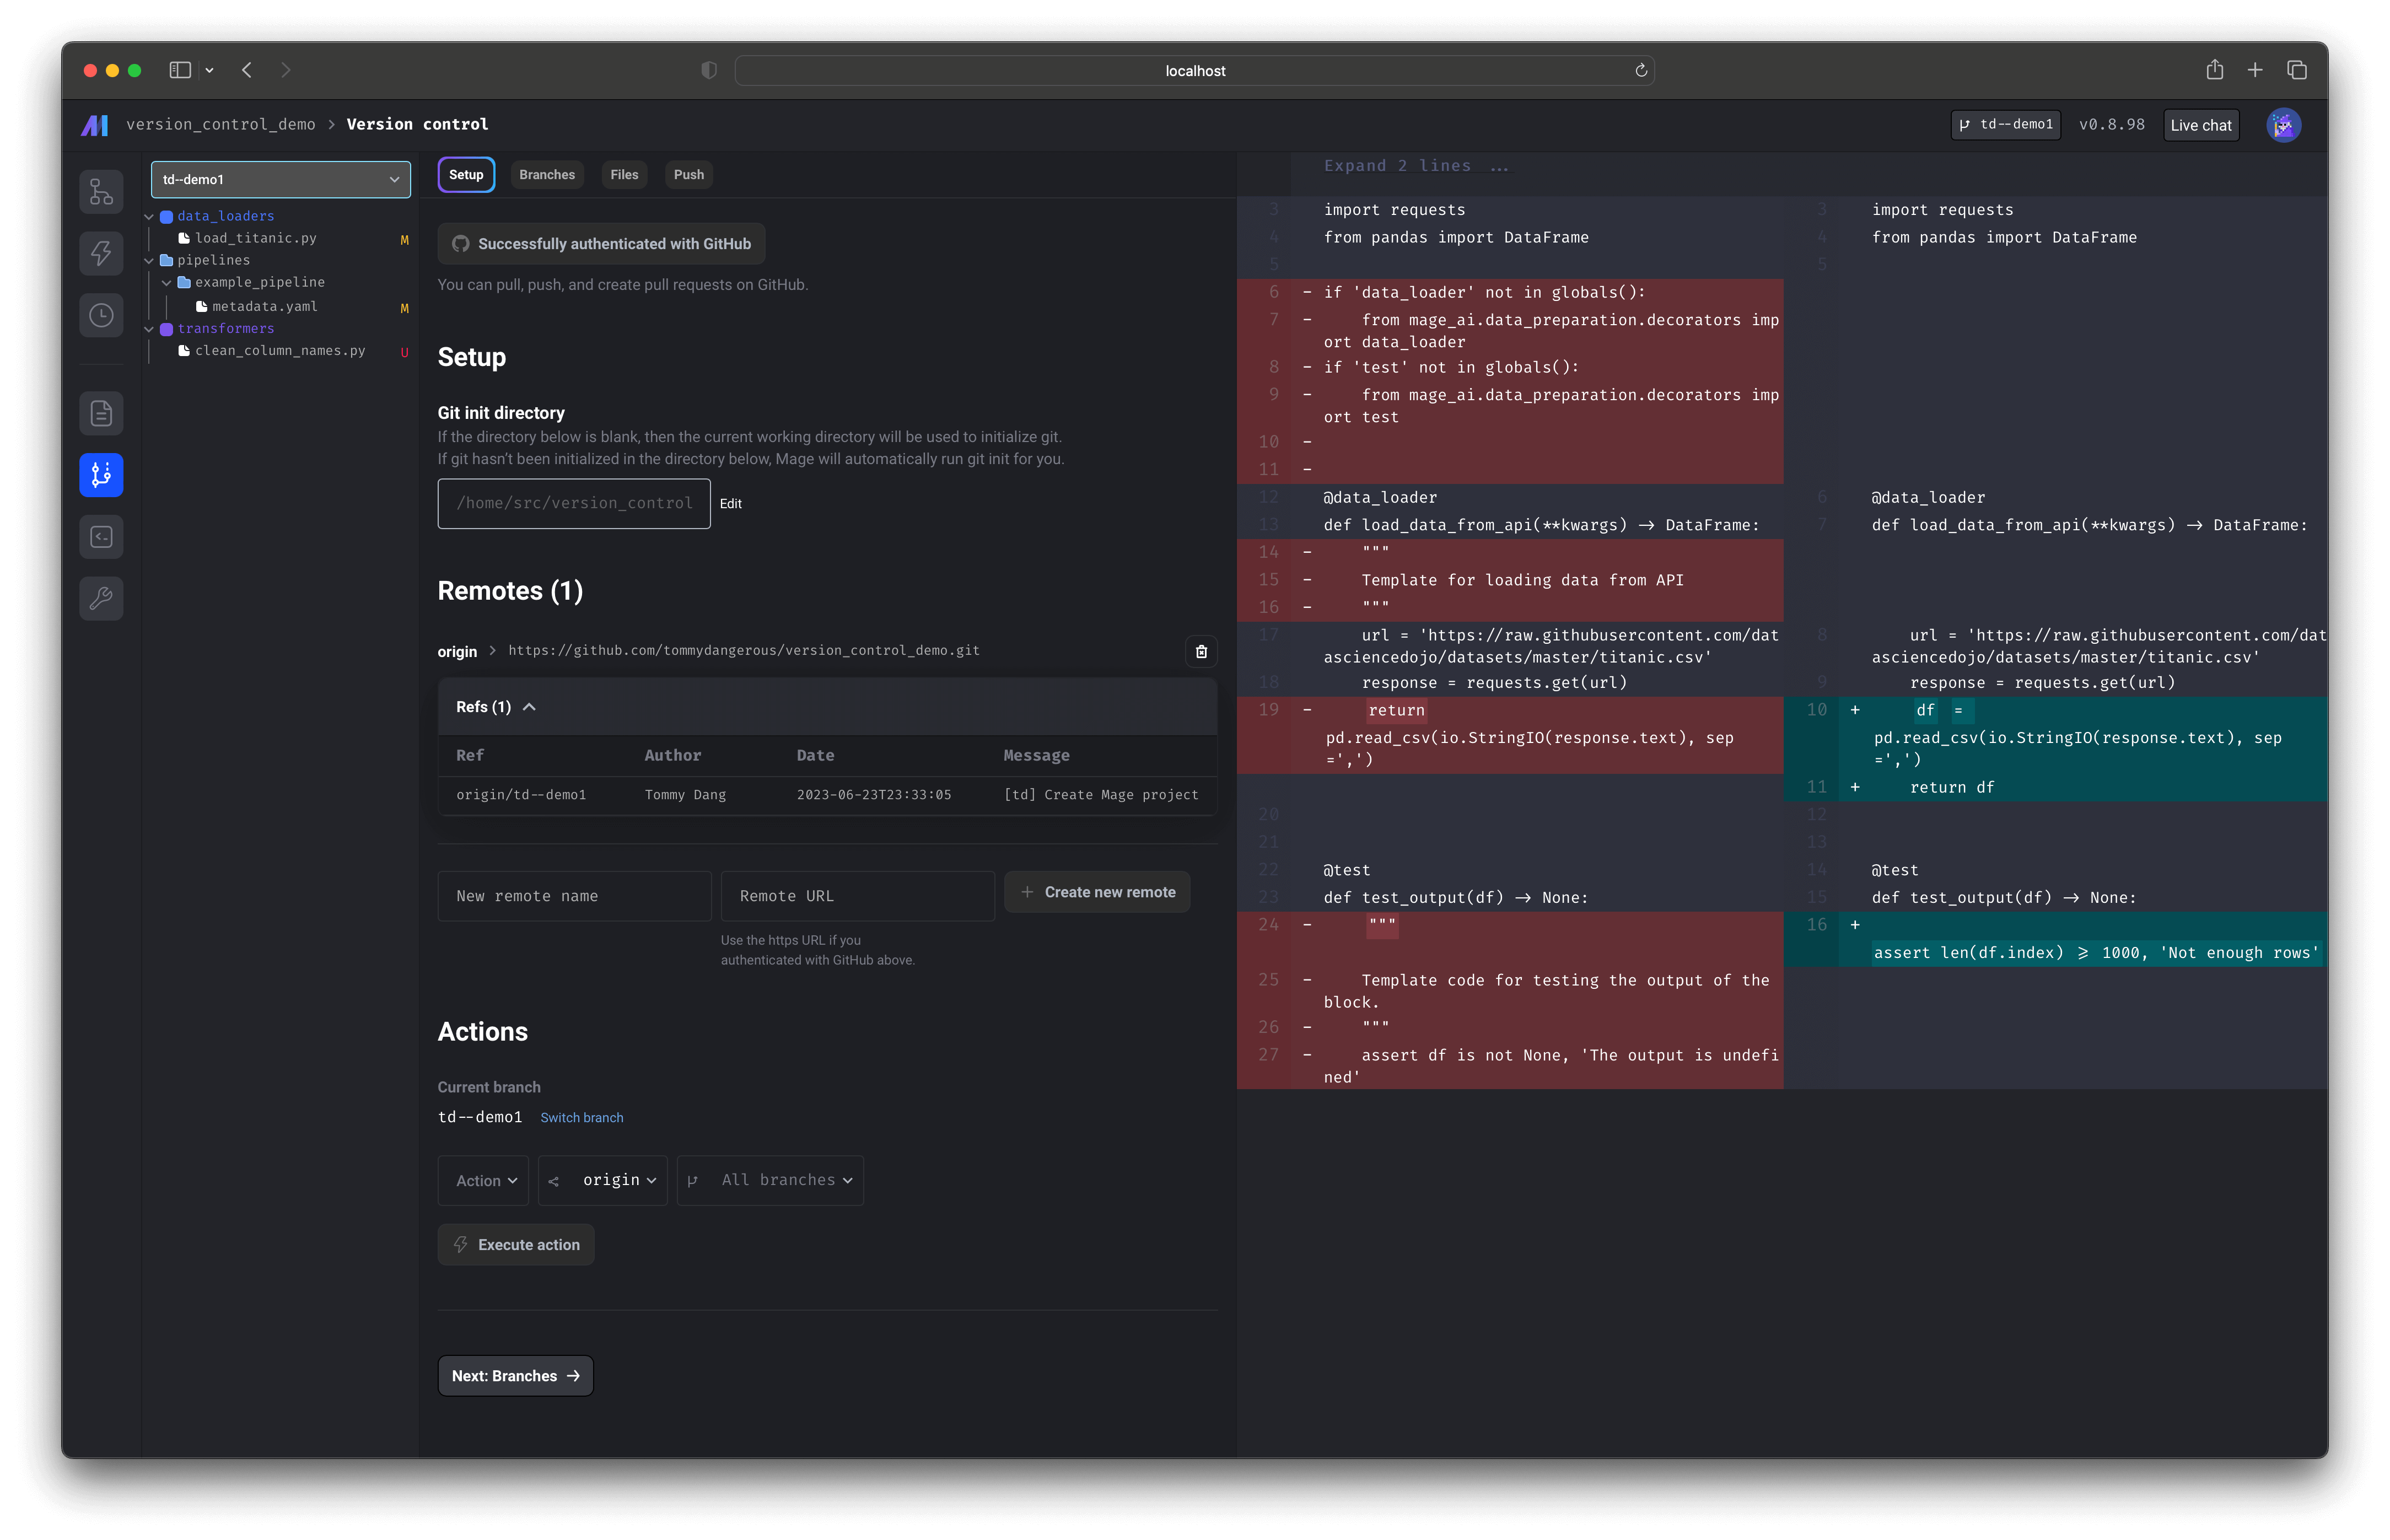 ### Authenticate with GitHub
Click the button labeled Authenticate with GitHub to authenticate with GitHub.
After authorizing Mage, you’ll be redirected back to the initial page and an access token will
be in the URL as a parameter. This access token is saved in your application’s database;
it never leaves your application’s database.
### Add remote
Enter a name for your new remote. For the remote URL, you must use the `https` version of the
GitHub repository (as opposed to the `SSH` version).
For example, the remote URL for Mage is `https://github.com/mage-ai/mage-ai.git`.
Note that a remote added via HTTPS/SSH authentication *will not* work— only a remote in the format above is accepted.
Once you fill in both input text fields, click the button labeled Create new remote.
### Actions
#### Pull remote branch
1. Under the Actions dropdown, select the option labeled Pull.
2. Under the Remote dropdown, select the name of the remote you want to pull from (e.g. origin).
3. Under the Branch dropdown, select the name of the branch you want to pull from the remote you chose from the previous step.
***
## Branches
### Authenticate with GitHub
Click the button labeled Authenticate with GitHub to authenticate with GitHub.
After authorizing Mage, you’ll be redirected back to the initial page and an access token will
be in the URL as a parameter. This access token is saved in your application’s database;
it never leaves your application’s database.
### Add remote
Enter a name for your new remote. For the remote URL, you must use the `https` version of the
GitHub repository (as opposed to the `SSH` version).
For example, the remote URL for Mage is `https://github.com/mage-ai/mage-ai.git`.
Note that a remote added via HTTPS/SSH authentication *will not* work— only a remote in the format above is accepted.
Once you fill in both input text fields, click the button labeled Create new remote.
### Actions
#### Pull remote branch
1. Under the Actions dropdown, select the option labeled Pull.
2. Under the Remote dropdown, select the name of the remote you want to pull from (e.g. origin).
3. Under the Branch dropdown, select the name of the branch you want to pull from the remote you chose from the previous step.
***
## Branches
 ### Switch branch
1. Under the dropdown labeled Current branch, select the name of the branch you want to change to.
2. After selecting a branch, the current branch will be updated to what you selected.
### Create branch
1. Type in the name of the new branch in the text input field.
2. Click the button labeled + Create new branch.
### Merge branch
1. Under the Base branch dropdown, select the name of the branch you want to merge into your current branch.
2. Under the Action dropdown, select the option labeled Merge.
3. Type a commit message for the merge action.
4. Click the button labeled Merge.
### Rebase branch
1. Under the Base branch dropdown, select the name of the branch you want to rebase into your current branch.
2. Under the Action dropdown, select the option labeled Rebase.
3. Type a commit message for the rebase action.
4. Click the button labeled Rebase.
### Delete branch
1. Under the Base branch dropdown, select the name of the branch you want to delete.
2. Under the Action dropdown, select the option labeled Delete.
3. Click the button labeled Delete.
4. Confirm the popup dialog box.
***
## Files
### Switch branch
1. Under the dropdown labeled Current branch, select the name of the branch you want to change to.
2. After selecting a branch, the current branch will be updated to what you selected.
### Create branch
1. Type in the name of the new branch in the text input field.
2. Click the button labeled + Create new branch.
### Merge branch
1. Under the Base branch dropdown, select the name of the branch you want to merge into your current branch.
2. Under the Action dropdown, select the option labeled Merge.
3. Type a commit message for the merge action.
4. Click the button labeled Merge.
### Rebase branch
1. Under the Base branch dropdown, select the name of the branch you want to rebase into your current branch.
2. Under the Action dropdown, select the option labeled Rebase.
3. Type a commit message for the rebase action.
4. Click the button labeled Rebase.
### Delete branch
1. Under the Base branch dropdown, select the name of the branch you want to delete.
2. Under the Action dropdown, select the option labeled Delete.
3. Click the button labeled Delete.
4. Confirm the popup dialog box.
***
## Files
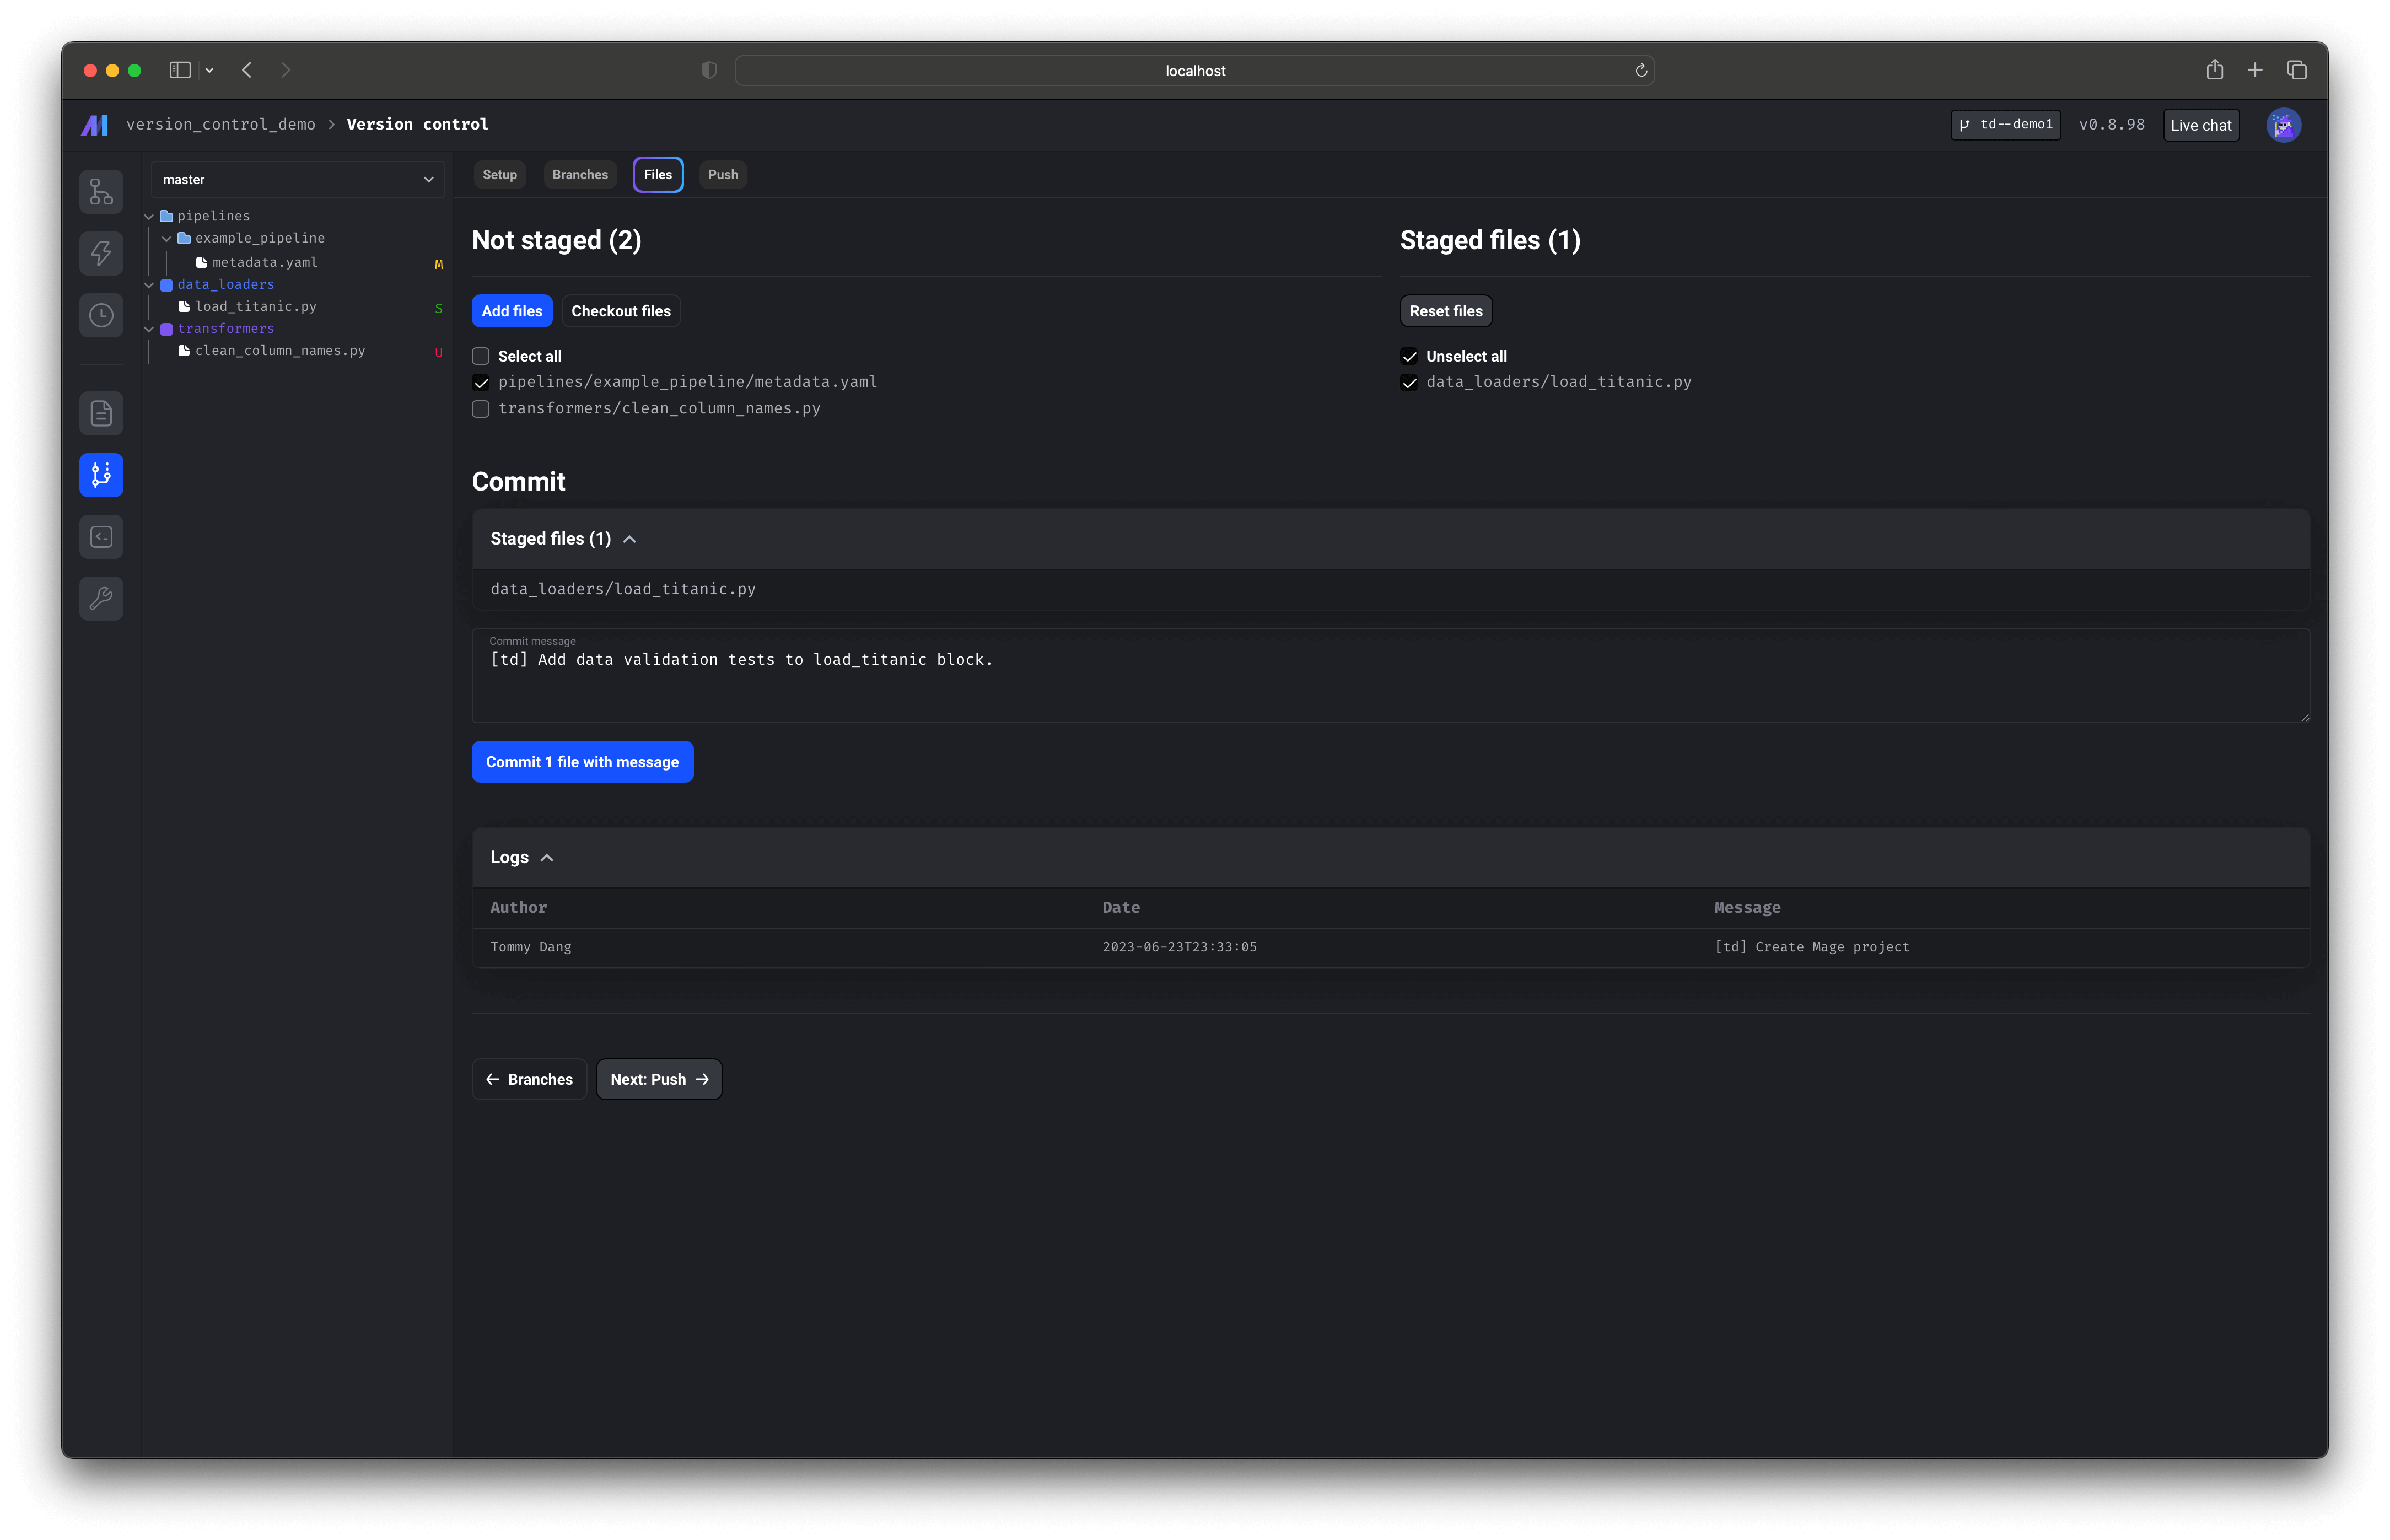 ### Add files
1. On the left side under Not staged, check the boxes next to the files you want to add.
2. Once you’re done selecting the files, click the button labeled Add files.
3. The selected files will be staged.
### Checkout files
1. On the left side under Not staged, check the boxes next to the files you want to checkout.
2. Once you’re done selecting the files, click the button labeled Checkout files.
3. Confirm the popup dialog box.
4. All changes to the selected files will be undone.
### Reset files
1. On the right side under Staged files, check the boxes next to the files you want to reset.
2. Once you’re done selecting the files, click the button labeled Reset files.
3. The selected files will be unstaged.
### Commit
1. Enter a commit message.
2. Click the button labeled Commit N files with message.
***
## Push
### Add files
1. On the left side under Not staged, check the boxes next to the files you want to add.
2. Once you’re done selecting the files, click the button labeled Add files.
3. The selected files will be staged.
### Checkout files
1. On the left side under Not staged, check the boxes next to the files you want to checkout.
2. Once you’re done selecting the files, click the button labeled Checkout files.
3. Confirm the popup dialog box.
4. All changes to the selected files will be undone.
### Reset files
1. On the right side under Staged files, check the boxes next to the files you want to reset.
2. Once you’re done selecting the files, click the button labeled Reset files.
3. The selected files will be unstaged.
### Commit
1. Enter a commit message.
2. Click the button labeled Commit N files with message.
***
## Push
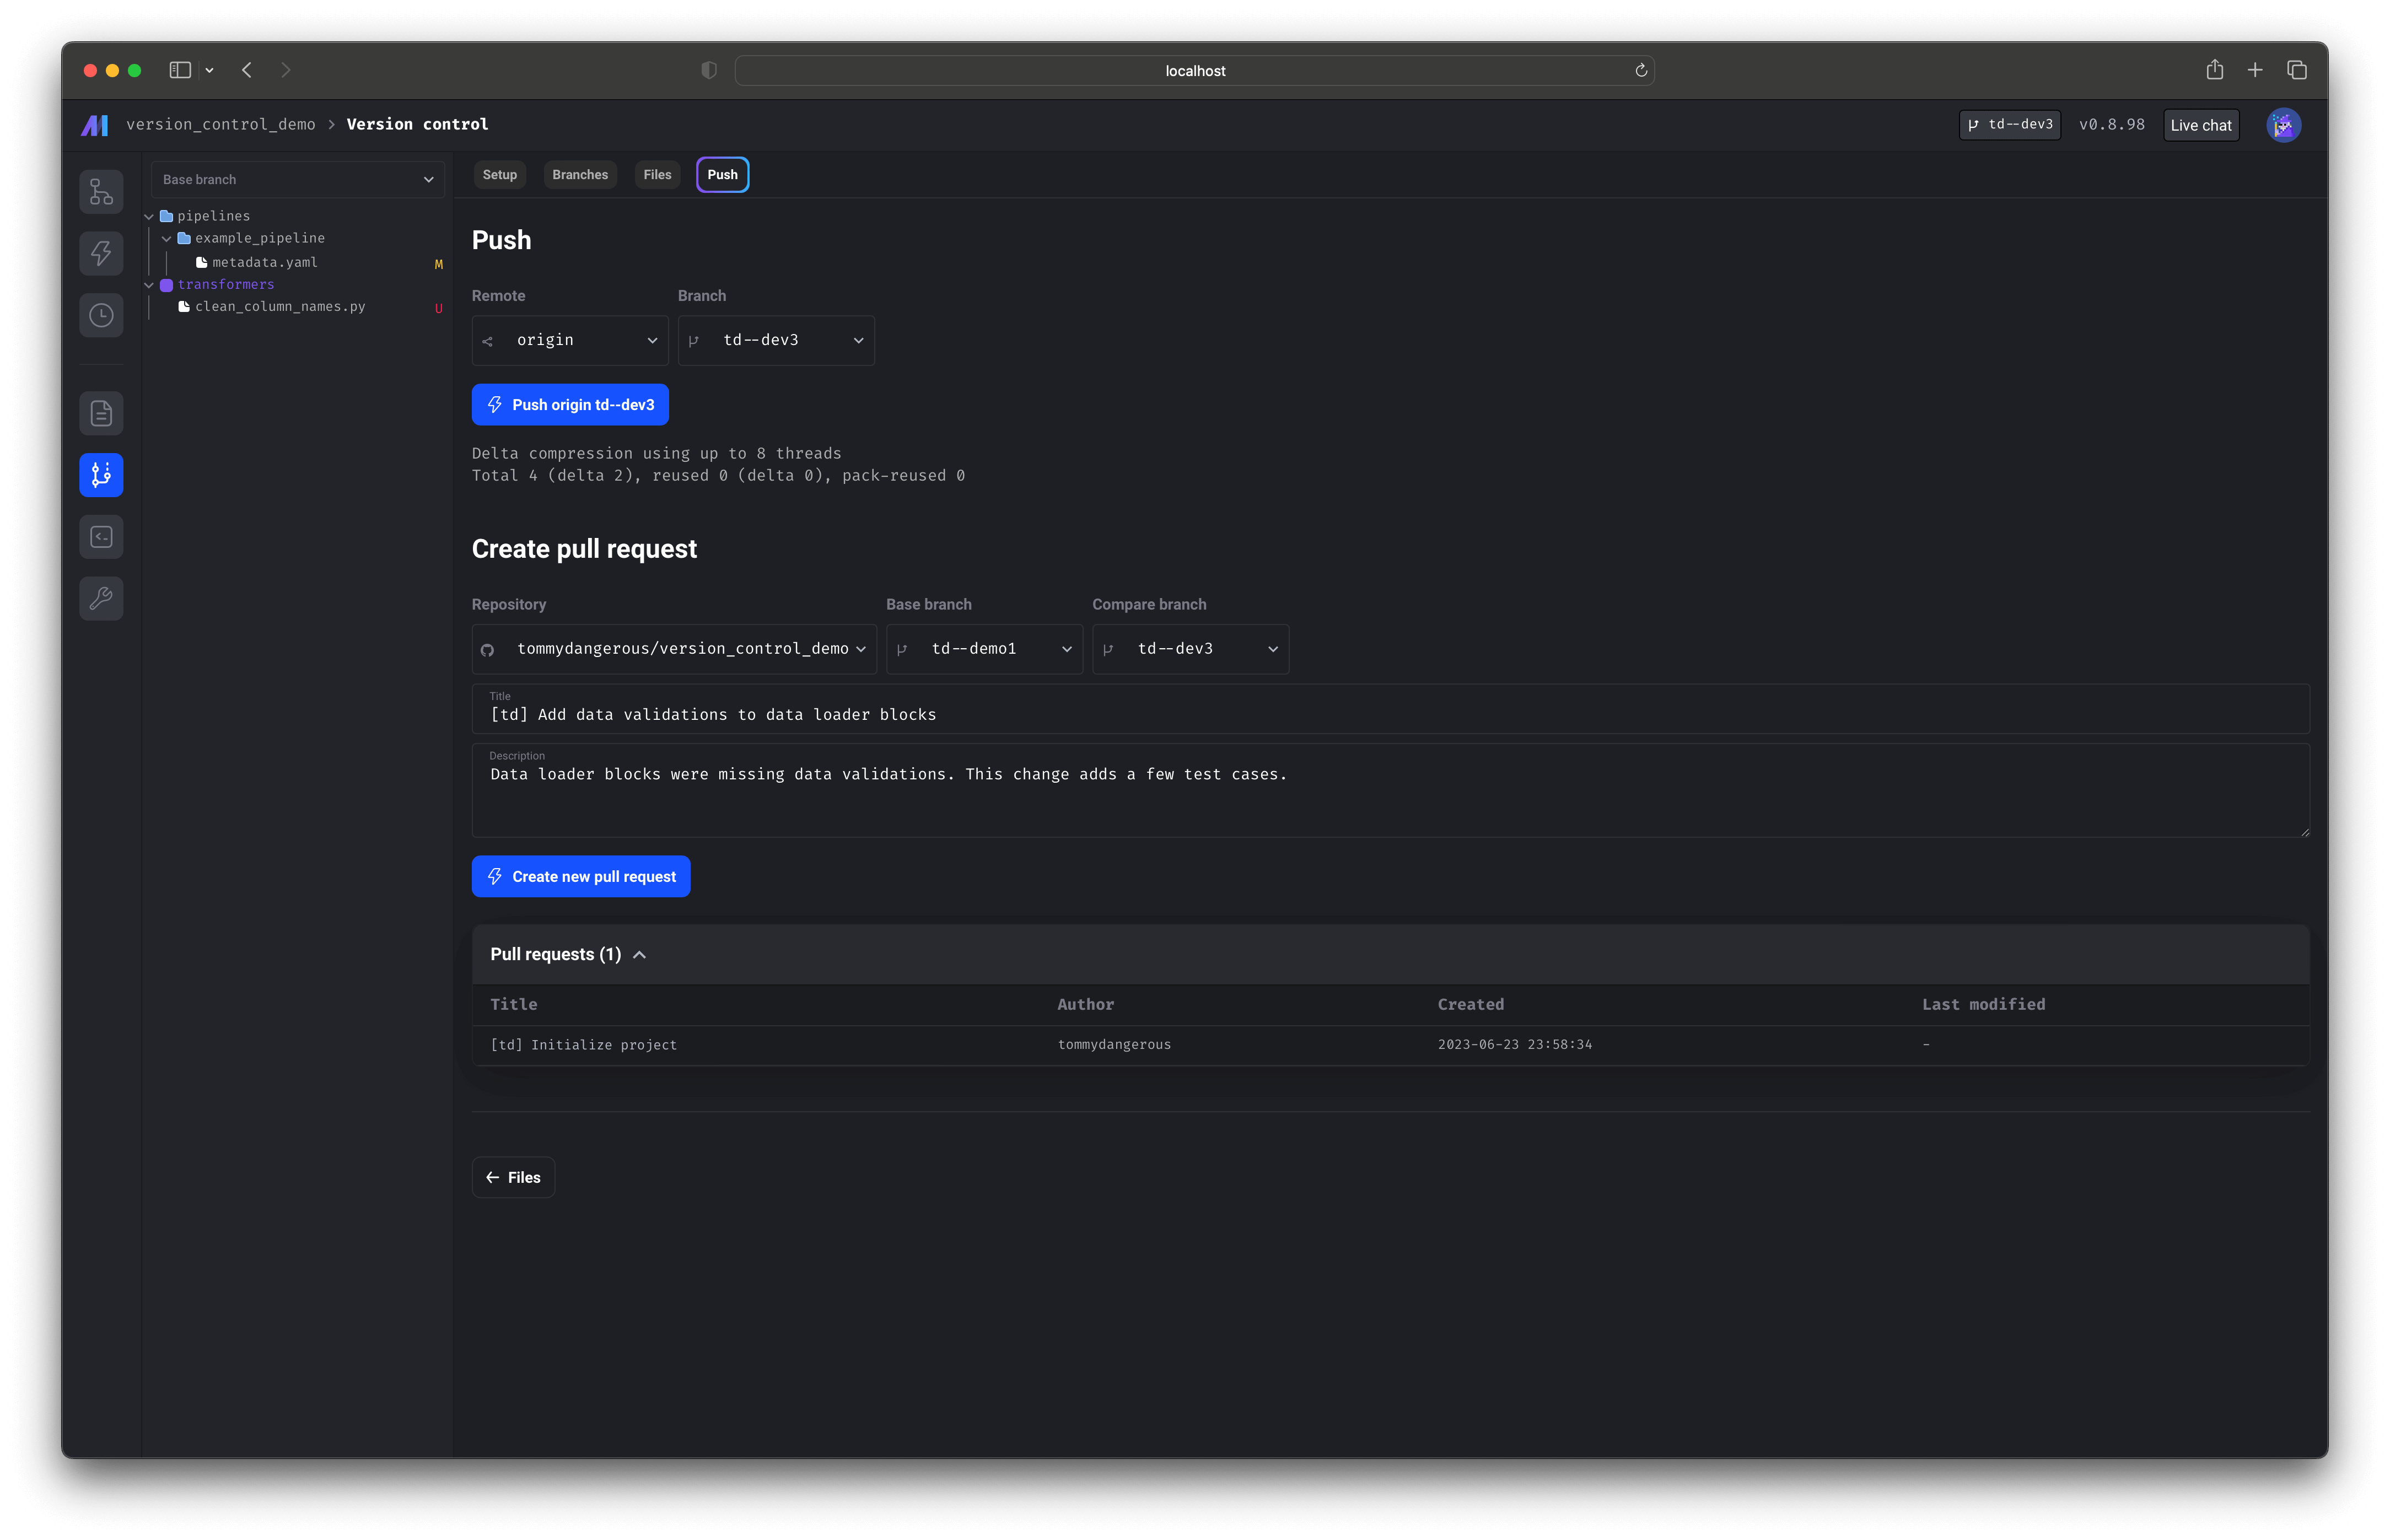 ### Push local changes
1. Under the Remote dropdown, select the name of the remote you want to push to (e.g. origin).
2. Under the Branch dropdown, select the name of the branch you want to push.
3. Click the button labeled Push \[remote] \[branch].
### Create pull request
1. Under the Repository dropdown, select the name of the repository you want to create a pull request for.
2. Under the Base branch dropdown, select the name of the branch you want your pull request to compare against (e.g. main).
3. Under the Compare branch dropdown, select the name of the branch you want your pull request to be for (e.g. feature branch).
4. Type the title of the pull request in the text input field labeled Title.
5. Type the description of the pull request in the text input field labeled Description.
### Push local changes
1. Under the Remote dropdown, select the name of the remote you want to push to (e.g. origin).
2. Under the Branch dropdown, select the name of the branch you want to push.
3. Click the button labeled Push \[remote] \[branch].
### Create pull request
1. Under the Repository dropdown, select the name of the repository you want to create a pull request for.
2. Under the Base branch dropdown, select the name of the branch you want your pull request to compare against (e.g. main).
3. Under the Compare branch dropdown, select the name of the branch you want your pull request to be for (e.g. feature branch).
4. Type the title of the pull request in the text input field labeled Title.
5. Type the description of the pull request in the text input field labeled Description.